.png?width=365&height=122&name=BTLogo%20(1).png)

A data tokenization platform supports zero trust architecture practices without losing your ability to interact with and use the tokenized data. For example, Basis Theory’s Elements capture data within your applications without needing to “see” the plaintext value.
But what if you need to inject sensitive data into a file, like a PDF, to deliver an invoice to a customer? Many invoices display sensitive data—like the customer's full name, address, contact information, or account numbers—that could pose a significant financial and reputational risk, if leaked.
One option is to detokenize the data in your application during the invoice generation process—just as you would, if you were storing the sensitive data in your own database. This has inherent risks: the sensitive data is now sitting in plaintext in your application. Now, additional controls are needed to ensure this environment is secure and compliant. It’s best then to generate the invoice where the tokens already are.
Basis Theory’s Reactors provide a secure and compliant way to perform serverless functions on your tokenized data. We’ll use these and the code outlined below to handle the invoice generation. Doing so will keep the detokenized data out of your application. Let's explore how that might look.
(Want to jump right into the code? Check out the GitHub repository for this example!)
The PDF file
There are two ways to begin the PDF generation process:
- build the entire PDF using the Reactor, or
- send a partially complete PDF to the Reactor and insert the sensitive data
For this example, I have chosen only to insert the sensitive data. There are several reasons that I think this is the preferred route:
- Less data is needed by the Reactor. To generate the whole invoice, you would need to send every line item to the Reactor. While this is possible, it seems like unnecessary overhead—not all the information on the invoice is sensitive, and handling that data in your application may be more efficient.
- Better error handling. Programmatically generating PDFs can sometimes be finicky, even in the year 2022. By limiting the amount of processing the Reactor does, it simplifies troubleshooting by keeping as much of the processing local to your application as possible. Of course, there may be errors while processing the Reactor, but the chance of those is minimized by only handling the sensitive data instead of the entire invoice.
However, one drawback to this approach is that the total size of the PDF could become an issue. This example uses a single-page PDF that is small in size and easy to transmit as a base64 encoded byte stream to the Reactor (more on this later!). At the time of writing this article, Reactors have a limit of 1MB per request, so a different approach may be required if the PDF is several megabytes or larger.
Because I chose to send a partially completed invoice to the Reactor, we need to have the rest of the invoice filled out. However, creating the invoice from scratch is beyond the scope of this post, and I decided to keep it simple: I took one of the default Google Docs templates, made some small modifications to it, and then exported it as a PDF. View the PDF in the code repository for this post.
Sending the PDF to the Reactor
We must first solve how to send the PDF to our custom Reactor. Reactors accept (and return) a JSON body, so we’ll convert the PDF to a base64 encoded byte array. How you do this will vary greatly depending on your application's language and framework. For this example, we will use JavaScript and NodeJS.
When invoking the reactor, we pass the contents to the arguments object. We will also need to provide the token IDs for the user's contact information and account number. This example assumes you have a user object with the full name and address tokenized as a single token and an associated token with the account information.
Receiving the PDF
When the request hits the Reactor, the args object passed to your custom function will contain the request values. We will be using pdf-lib to edit the PDF programmatically. pdf-lib works with NodeJS Streams, so the first step is converting the base64 string into a writable stream. We then pipe that stream into pdf-lib, following their getting started guide.
NOTE: The req.args object also contains the detokenized values for the user and account. The token IDs were automatically detokenized when passed as an argument to a Reactor.
Inserting sensitive data
This PDF requires us to enter the user's contact information and account number. To place the data in the proper positions with pdf-lib, we need to know the XY coordinates for each line of text. This is trickier than it seems, but with a little effort, you can get the coordinates for each text block. If you generated the PDF from scratch, you’ll likely know the coordinates and don't need to figure them out manually.
The first thing to remember is that the PDF spec starts measuring pixels from the bottom left corner of the document. So make sure you grab the bottom-left XY coordinates for your text placement! If you already have PDF editing software on your workstation, it is probably the simplest to use. One free method to find the coordinates is to convert the PDF to a JPG with a resolution of 72ppi (the standard PDF resolution), then use image editing software to find the coordinates. My workstation is a MacBook, so I used the built-in Preview app to do just that:
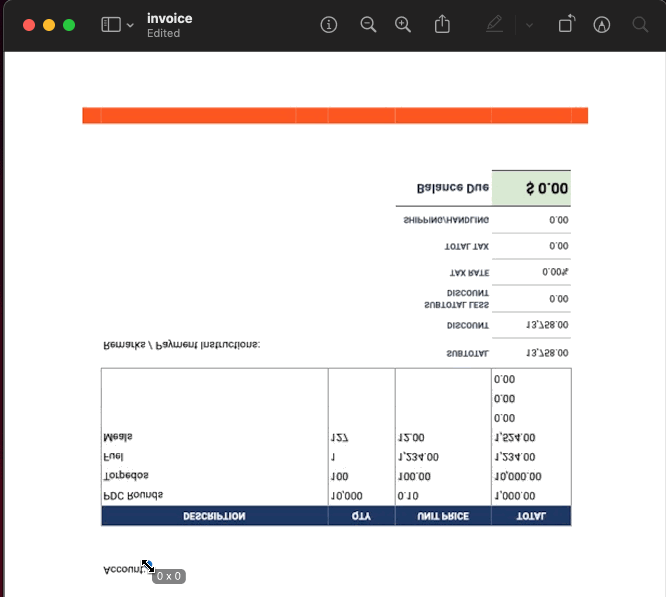
The coordinates I discovered for the account number were X: 132, Y: 474. After drawing the account number to the PDF, I found those coordinates were slightly off. You may need to make small adjustments to ensure everything lines up the way you want. After minor adjustments, I found the correct coordinates were X: 135, Y: 478. (I can hear you asking: How do I test it locally? Don’t worry, that’s coming!)
pdf-lib provides a convenient drawText() method that accepts the string and a configuration object that includes the XY coordinates. You can also set the font family, size, color, and more. For this example, we continue to keep it simple by using the default font.
The invoice template I am using requires us to write the data to both the “Bill To” and “Ship To” sections. The snippet above draws the text for “Bill To.” For the “Ship To” section, we draw the text a second time but shift the X value by 208. You can view the complete draw routine in the repository.
Writing the PDF file
Now that you've finished writing the sensitive data to the PDF, you need to close out the stream and send it to its final destination. You could upload the file to a secure file storage bucket, send it via SFTP or HTTPS to another service, or even download it right to your client application. For this example, we will return the PDF as a base64 encoded string to the service that invoked the Reactor.
Running your code locally
With a couple of small modifications, we can run our new function outside the Basis Theory platform to ensure that everything works as expected - and that all your text lines up the way you want it to! We can call our new formula function and pass in values to test it with, then take the returned value and write it to a file.
Execute your script using NodeJS and see the results!
Uploading the Reactor
Now that your Reactor works how you want, we’ll create a new Reactor using your code. It’s a simple process but does have a few steps you need to follow. So, rather than typing out our guide again, I encourage you to read the complete guide for writing your Reactors in our documentation. You can also view the final configuration file in the repository for this example, and the README contains more details on creating this particular Reactor.
Let’s recap
Basis Theory's tokenization platform eliminates up to 95% of the burden of PCI compliance while providing your team the flexibility to get your work done—securely—without losing time trying to make existing workflows work for you. In addition, your developers can bring their code to a Reactor, giving you complete control over the business logic and processes.